
BMW E36 V8 Swap: Some facts
Why You Might Want To. An aluminum block LSx engine makes a fine swap into the BMW E36 6-cylinder BMW. Our engine mounting kit requires more work than most, but the extra work will pay off with reduced vibrations coming into the car and increased safety. Here are some facts to guide you.
Notes on the Installation of Our Mounting Kit, Headers, Cooling, Differentials, Exhaust, and More.
MOUNTING KIT
Important: Be aware that using the balljoint bolts to mount the engine is potentially dangerous. If the balljoint bolt comes loose, the control arm can fall off, and the car will be uncontrollable.
Our mounting kit requires removing the stock BMW engine mounting pads on the rear of the subframe. This is done primarily to improve header clearance. The increased room for the header makes it easier to use the stock steering shaft.
The design of the mounting kit distributes load to the frame rails to prevent fatiguing the crossmember. The wide distance between motor mounts reduces the amount of engine twist for a given torque, reducing problems with headers banging into the steering shaft and brake booster.
The mounting kit uses 1984-1991 Chevrolet Corvette isolators to reduce vibrations going into the car. These mounts are fairly stiff, and limit engine movement.

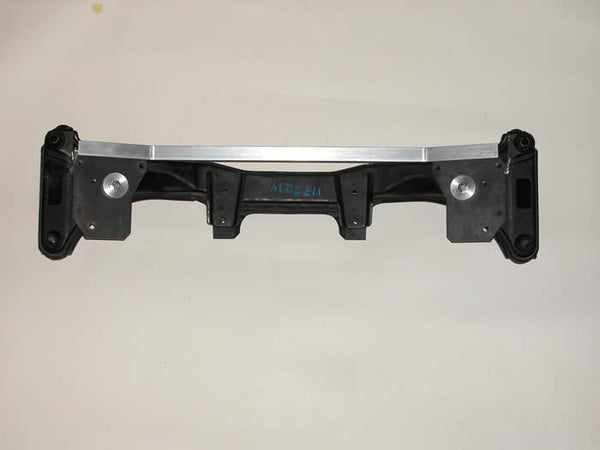
The stock E36 crossmember is on the left. The center crossmember has stock E36 mounting pads removed. This provides 1-1/2" additional room for headers.
The right side crossmember has a prototype mounting pad installed, and a 1" x 2" hole for inserting attachment hardware.
 The transmission crossmember assembly is shown above. Note that the thick center section is mounted below the horizontal side pieces.

After removing the stock E36 engine mounting pad from the front subframe, and enlarging the stock hole to a 1" x 2" rectangular hole, install the adapter plates to the subframe, using the pieces shown above to align the pads onto the front subframe, as shown below.
Enlarge the stock hole in the subframe to a 1" wide x 2" long rectangular hole (as shown below), as this is required to install fastening hardware inside the subframe.

Use a 3/8" drill bit to drill holes on the marked spots. Be sure to deburr the inside of the subframe so that the attachment hardware fits flush to the inside of the subframe.
Temporarily install the mounting pads onto the subframe, and double check the alignment. If the 3/8 holes drilled into the subframe are not properly located, use a file or die grinder to elongate the holes to the proper location.
Paint the subframe with semi-gloss black engine enamel to prevent rusting. Semi-gloss black paint matches the stock BMW paint very well.

Insert the bar with the two threaded holes into the subframe through the 1" x 2" rectangular hole, and screw the 3/8-16 socket head cap screws into the back two holes.
Insert a 3/8-16 nut into the subframe, and screw the front socket head cap screw into the nut. Insert a 9/16 wrench through the 1" x 2" rectangular hole to hold the 3/8-16 nut while tightening the socket head capscrew.
If you have problems doing the above, turn the subframe up-side-down, and allow gravity to hold the bar into place.
Remove one socket head capscrew, install blue Loctite onto the screw, and reinstall. Repeat with the other socket head cap screws. Tighten the socket head cap screws to 35 ft-lbs.

Put a piece of aluminum tape over the 1" x 2" rectangular hole as shown. If you don't do this, you will probably drop a nut or bolt into the subframe when it is installed in the car.
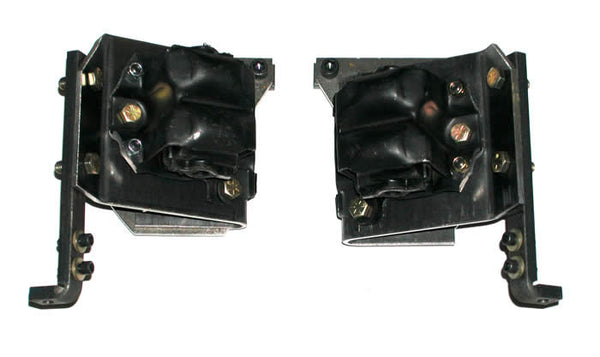
Below are views of the left and right motor mounts included in the kit.


Drill holes into the frame rail, as shown below (Two 5/16" holes and one 1/2" hole), using the "frame insert" as the template.

Install the "frame rail insert" into the frame rail with the threaded rod.

Insert the bar with the tapped holes into the frame rail as shown below.

Attach the 1/4-20 socket head cap screws first. Do not tighten. This will allow you to move the frame insert slightly, when installing the 3/8-16 bolts that attach the motor mount pad to the frame rails. 
Driver's side shown above. Passenger's side shown below.

Mounts have slotted holes to allow adjusting engine position side-to-side, and front-to-back. The height of engine can be adjusted by installing shims or spacers between engine and adapter, or between rubber isolator, and frame adapter bracket. This allows for optimum engine position to prevent the engine from contacting the subframe, frame rails, and steering shaft.

Make use of the slotted holes in the mounts to allow adjusting engine position side-to-side, and front-to-back. The height of engine can be adjusted by installing shims or spacers between engine and adapter, or between the rubber isolator and frame adapter bracket. This allows for optimum engine position to prevent the engine from contacting the subframe, frame rails, and steering shaft.
HEADERS
Our long-tube headers can be used with the stock BMW steering shaft. Aftermarket steering shafts can cause noise and vibration to enter the car due to a lack of a rubber isolator.
The steering shaft must be removed to install the header on the driver side, and then it fits between the header tubes.
It is pain to install the steering shaft the first time, but it shouldn't take more than ten minutes. After you have experience, it should take less than five minutes. The primary tubes are 1-3/4" diameter.
Advantages of our headers, compared to others, is that our headers have the longest primary tube lengths, which improves power within the normal rpm ranges of LSx engines.
The headers have the straightest exit, from the cylinders heads, which improves performance.
O2 sensors will have to be installed after the headers.
SHORTY HEADERS

The shorty headers are a low cost alternative to long-tube headers. Unless you are running a big cam, with lots of overlap, the long-tube headers do not have a big power advantage over shorty headers.
Advantages of the shorty headers are: low cost, easier installation, and less heat in the engine compartment and transmission tunnel. The shorty headers are also substantially lighter than long-tube headers. The headers should work with the stock steering shaft.
Estimated price of the 1-5/8" primary, 2-1/2" collector header is $300 for plain steel and $425 for ceramic coated. Options include V-bands, which will be about $100 extra.
Headers may not work with some mounting kits, and requires relocation of ABS pump.
Prototype header shown above. Contact us about availability.
COOLING

Radiator: The stock E36 6-cylinder radiator is perfectly adequate for the V8 swap. Radiator hoses from the small-block or the LSx engines can be spliced to the BMW 6-cylinder radiator hoses with our hose splicers.
Fan: The stock BMW pusher fan can be replaced with a much more powerful fan from a Volvo 850, 960, or V70 fan as shown above. It is mostly a bolt-in swap, but it requires drilling one mounting hole in the Volvo fan assembly.
The wiring to the fan should use the Volvo 2-speed fan relay, and it should be activated with the BMW relay.
Because the front-mounted pusher fan is shrouded/ducted, it works much better than the typical front-mounted pusher fan, which has no shroud or ducting. Because the Volvo fan is so powerful, in the majority of cases, no other cooling fan is required.
If you are installing a used Volvo fan, be sure to measure the amp draw, because a lot of used fans are worn out, and draw excessive current, while at the same time, they don't move a lot of air.
The stock BMW fan draws about 10 amps on low speed, and about 25 amps on high-speed. The Volvo V70 fan should draw about 17 amps on low speed and about 35 amps on high-speed.
Differentials and half-shafts:
The E36 is available with three sizes of differentials. small, medium, and large. The small differential came on 4-cylinder cars and is not suitable for the V8 swap.
The medium size differential (188 mm, or 7.4" ring gear diameter) came on all 6-cylinder cars sold in American, including the M3 cars. It seems to be adequate for the V8 swap.
The large differential (210 mm, or 8.27" ring gear) came on 1996 and newer European M3 cars.
Half shafts. The half-shafts on non-M3 6-cylinder cars appear to be adequate for the V8 swap. The half-shafts on the M3 cars have larger CV joints, and a larger hub spline at the rear wheels.
Driveshaft: A driveshaft shop can make a one-piece driveshaft that goes from the Chevrolet transmission to the BMW differential with our driveshaft flange.
Weight. There is a lot of misinformation pertaining to the weight gain of the V8 swap. A lot of people are claiming there is no weight gain, but they are removing air conditioning, catalytic converters, insulation, and other items. They may also be running smaller batteries, and they may weigh the car with an empty tank of gas, or they may simply be guessing what their cars weigh.
A stock, fully-dressed 325 engine and 5-speed transmission weighs about 530-550 lbs. BMW 328 engines with aluminum blocks weigh less. All M3's came with cast-iron blocks.
An aluminum block LSx engine with the T56 transmission will add at least 100 pounds to the weight of a stock 325 with the 5-speed.
A small-block V8 with the T5 transmission will add at least 200 lbs to the weight of a stock 325 with the 5-speed.
A small-block Ford V8 weighs about the same as a small-block Chevrolet (within ten lbs). We aren't sure why people insist that the Ford small-block is up to 100 lbs lighter than the Chevrolet small-block.
Exhaust.The stock non-M3 6-cylinder exhaust after the catalytic converter is about 1-7/8" dual exhaust. The stock non-M3 muffler is free flowing, quiet, and is adequate for most V8 swaps. A muffler shop can connect the V8 exhaust to the 6-cylinder exhaust for the lowest cost exhaust system. The biggest complaint about the stock muffler is the weight.
The M3 exhaust, after the catalytic converters, is 2-3/8" dual exhaust, and the muffler seems to be the same as non-M3 6-cylinder cars. It is adequate for stock LSx engines. The biggest complaint about the M3 exhaust is the weight, and as a result, used M3 mufflers can often be purchased for a reasonably low price.
The small-block V8 swap can use rams-horn exhaust manifolds, which are inexpensive, and they do not radiate a lot of heat. They will clear the ABS pump, but we are not confident that the heat from the manifolds will not be a problem, unless heat reflecting products are put on the brake booster. The small-block V8 does not require any modifications to the stock E36 brake booster.
With the LSx V8 swap, we do not know of any factory GM exhaust manifolds that will fit on the driver's side.
Dashboard instruments.The stock instrument cluster will perform as stock with the V8 swap. The speedometer gets its signal from the differential, so no adapters are required.
The 1996 and newer water temperature sending unit bolts onto the LS1 cylinder head.
Small block engines can use the water temperature bushing shown on this link to install the 1992-1995 E36 water temperature sending unit.
V8 BMW Water Temperature Bushings.The tachometer signal from the LSx ECM can be programmed to provide the correct signal to the BMW tachometer.
The fuel economy gauge in the instrument cluster uses the injector pulses and speedometer inputs to provide the fuel mileage. With the LSx swap, the fuel economy gauge can be calibrated with parts from this company: www.seattlecircuit.com
Steering shaft/Firewall modifications. Some people are recommending that the steering shaft be replaced with an aftermarket shaft for header clearance.
We believe it's better to move the steering column where it goes through the firewall, to make more room for the headers.
In addition, the steering shaft from the E46 can be installed into the E36, with some slight modifications. The modified E46 shaft provides about 3/16" more clearance.

Remove the welded on bolts from the firewall by drilling out the spot welds from inside the car.
These are on the engine side of the firewall.
After removing the welded on bolts, the firewall will look something like shown below.

Use a die grinder and/or file to modify the original big hole so that it can accommodate the new position of the steering column.
For the LSX engine swap, move the steering column down 3/8" and towards the center of the car 3/8" as shown below

The picture shows a hacked-up job, in part, because the car is being used for other engine swaps. For example, with the older style Chevrolet small-block, the steering column is moved in a different direction.
By moving the steering shaft down and towards the center of the car, a lot more room is created for the header, and the engine can be mounted slightly lower.

The E46 steering shaft (topmost) is smaller in diameter, and provides more room for the header tubes that go between the frame rail and the steering shaft. The E46 steering shaft is also about 1/2" longer than the E36 steering shaft, but can easily be modified to make it the same length as the E36 steering shaft.

Using a file and a hacksaw, the E46 shaft can be modified by filing another slot with a round file, about 1/2" rearward of the original slot, and then cut the small tab off the front of the shaft.
If you want a little more adjustability in the shaft, you can file the slot wider.

After the modifications, the E46 shaft will be the same length as the E36 shaft, as shown above.
Camaro Air Conditioning Compressor

With our engine mounting kit, the air conditioning compressor will have about 1/4" clearance from the frame rail.
1/4" clearance is not enough if you are using stock Corvette replacement mounts. The compressor mounting bracket requires some machining to move the compressor 1/4" closer to the engine, but it is pretty easy to do.
The tensioner pulley needs to be removed (already removed in photograph) to install the ac compressor when engine is mounted in car.