s2c10d9
S10-2wd-short-bed-short-cab-driveshaft-alignment-kit-for-4-cylinder-6-cylinder-and-v8
S10-2wd-short-bed-short-cab-driveshaft-alignment-kit-for-4-cylinder-6-cylinder-and-v8
Couldn't load pickup availability
Why You Might Need One. This kit is for 2WD Short bed/short cab S-10 Trucks and 2WD Blazers that have the rear end lowered two or more inches. It adjusts driveline angles on swaps to:
- Reduce driveline vibration
- Decrease wear on driveline parts
- Increase power transfer to the rear wheels
- Improve fuel mileage
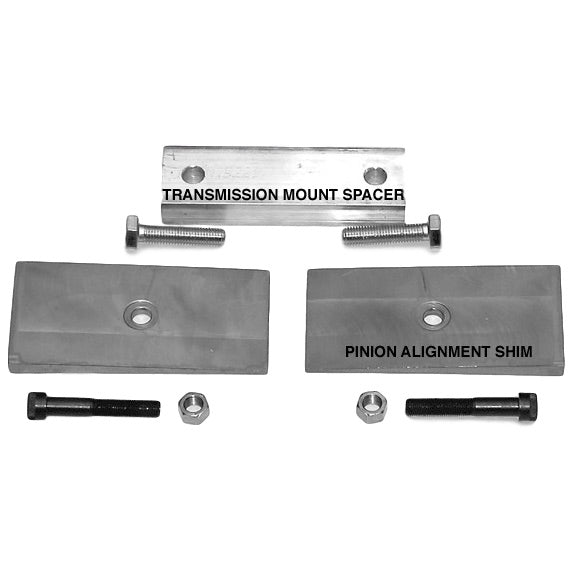
Kit includes billet aluminum transmission mount spacer with longer mounting bolts to raise the transmission 3/4" and alignment shims (also called axle alignment shims) with the required longer mounting bolts.
Ordering Guidance. Specify 2°, 3°, or 4° (2° for trucks lowered 2", 3° pinion alignment shims for trucks lowered 3-4 inches, and 4° shims for trucks lowered more than 4 inches).
Background on Driveshaft Alignment.
The diagram below helps illustrate some of the issues with driveshaft alignment.

Ideally, the transmission output shaft should point directly at the differential pinion shaft. This causes the driveshaft to make a straight path, reducing the amount the u-joints move (and wear).
However, because the ride height changes with differing loads, and because the leaf spring suspension allows the pinion angle to change under engine load, the driveline angles will not always be ideal. In other words, driveshaft alignment is an approximation, a "compromise."
Typically, the best compromise for driveline alignment in S-10 trucks and Blazers is to have the transmission output shaft point about 1" to 2" above the differential pinion shaft. This can be accomplished by installing adjustment shims between the transmission and the transmission mount. The reason to have it point slightly above the pinion shaft is so to prevent the driveshaft angles from getting worse when the truck is carrying a load.
The pinion angle should be about 1/2° to 2° low when the vehicle is parked on level ground. During normal driving, spring wrap-up will make the pinion angle rise to be parallel to the transmission output shaft.
S-10 short bed/short cab trucks lowered two-inches in the rear have a driveshaft misalignment of:
- 1° to 2° between the transmission output shaft and the driveshaft.
- 1° to 2° between the driveshaft and the pinion shaft.
Mis-alignment beyond 3° causes noticeable vibration and excessive wear on the u-joints.
Driveline vibration will also contribute to:
- the dash rattling and interior parts coming loose.
- the differential pinion seal and the transmission seal wearing out and leaking.
- the transmission tailhousing bushing wearing out more quickly.
Our driveshaft alignment kit reduces the misalignment mentioned above to less than 2°, greatly reducing vibration and wear.
Transmission Output Shaft Alignment

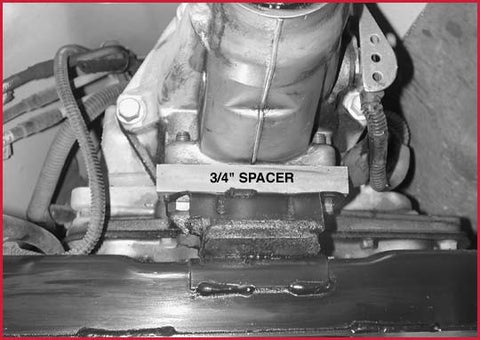
The above transmission in an S10 shortbed/short cab truck that was lowered three inches with lowering springs.
After lowering a truck, the first step in getting the driveshaft aligned properly is to raise the back of the transmission so the output shaft points directly to the differential pinion shaft.
As you can see, the transmission has been raised 3/4" with an aluminum spacer. The transmission should be raised slightly higher, but that would cause the transmission to contact the floor of the truck and rattle on bumpy roads unless the floor of the truck is modified (hammered) to improve clearance.
The bolts that attach the transmission mount to the transmission are longer than stock to accommodate the thickness of the spacer and are included in the driveshaft alignment kit.
Pinion Alignment Shins. Stealth Conversions' pinion alignment shims (included in the kit but available separately here) deal with the additional degrees of misalignment. They should be installed directly to the leaf spring with socket head cap screws supplied with the alignment kit.

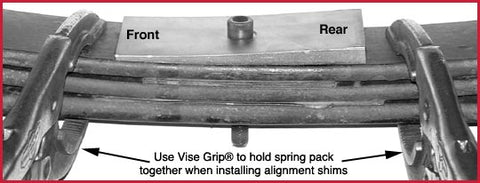
When installing the shim onto the leaf spring pack, hold the spring pack together with a pair of Vise Grips® or C-clamps before removing the original bolt.
If lowering blocks have been used, the alignment shim should be installed on top of the lowering block. Stealth Conversions lowering blocks included in the kit (available to explore and order separately here) are designed to allow bolting alignment shims on top of them.
Click to read more about our selection of lowering blocks and order them. Lowering blocks are designed to allow bolting alignment shims on top of the lowering blocks.
Pinion Alignment Shim Installation Tips

The stock bolt (shown on top) that holds the leaf-spring pack together is 3/8" diameter by 2" long with a 3/8"-24 thread. It has a head diameter of 9/16", and a head height of 5/16".
When installing axle alignment shims to adjust driveline angles, the original bolt may be too corroded to remove without breaking — or a longer bolt may be necessary.
The 2°, 3° and 4° axle alignment shims from Stealth Conversions are about 1/4" to 3/8" thick at the center, and may require changing the original leaf spring bolt with a longer bolt. This kit comes with a pair of 2-1/4" long socket head screws and hex nuts.
If the socket head bolt is too long and interferes with the lower shock plate, cut the bolt with a hacksaw, or a grinder.
Lowering Blocks and Pinion Alignment Shims
On trucks lowered using lowering blocks, we recommend billet aluminum lowering blocks from Stealth Conversions.
The Stealth Conversions lowering blocks are unique in that the top of the block is threaded. This allows the pinion alignment shim to attach to the lowering block while leaving the full height of the cap screw for the rear-axle locating hole.
Stealth Conversions also has heavy-duty U-bolts for S-10 trucks with lowering blocks. The U-bolts use 9/16" diameter threads instead of the 1/2" diameter U-bolts that come with "universal" lowering kits. In addition, the Stealth Conversions U-bolts are made for the 2-3/4" diameter axle tubes used on S-10 trucks, instead of the "universal" U-bolts made for 3" diameter axle tubes.
The Stealth Conversions lowering blocks are unique in that the top of the block is threaded. This allows the pinion alignment shim to attach to the lowering block while leaving the full height of the cap screw for the rear-axle locating hole. See below. Click to read more about our selection of lowering blocks and order them.
Installation Tips. When installing the shim onto the leaf spring pack, hold the spring pack together with a pair of Vise Grips® or C-clamps before removing the original bolt. See below.

The original bolt may be too corroded to remove without breaking -- or a longer bolt may be necessary. Stealth Conversions pinion alignment shims should be installed directly to the leaf spring with a 2-1/4" socket head cap screw. See below.

If lowering blocks are used, the alignment shim should be installed on top of the lowering block. Stealth Conversions Lowering blocks are designed to allow bolting alignment shims directly to the lowering blocks.
Share


